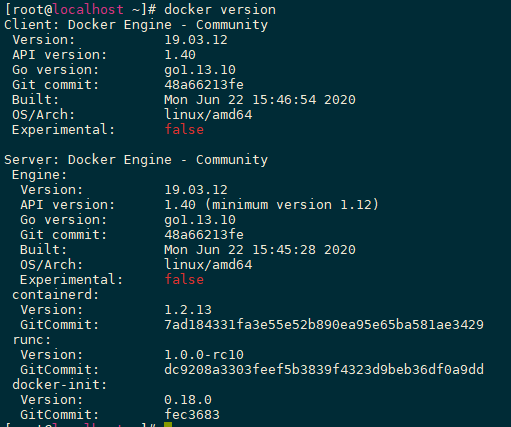
docker version # 显示docker版本信息 docker info # 显示docker系统信息 docker --help# 帮助命令
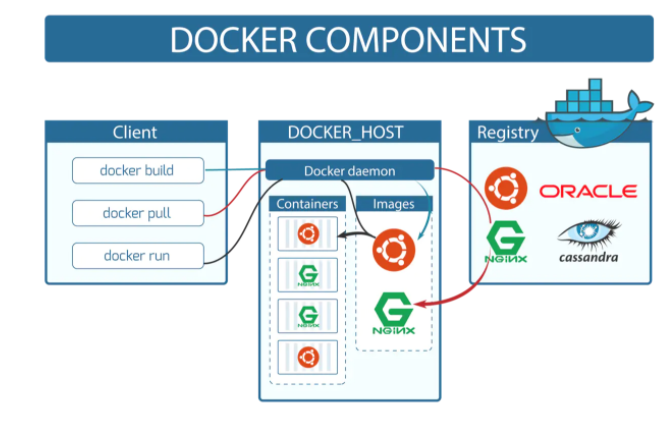
镜像命令
docker images 查看所有镜像
1 2 3 4 5 6 7 8 9 10 11 12 13 14
[root@localhost etc]# docker images REPOSITORY TAG IMAGE ID CREATED SIZE hello-world latest bf756fb1ae65 8 months ago 13.3kB [root@localhost etc]# docker images --help # REPOSITORY 镜像的仓库源 # TAG 镜像标签 # IMAGE ID 镜像id # CREATED 镜像创建时间 # SIZE 镜像大小
# 可选项 -a,--all # 列出所有镜像 -q,--quiet # 只显示镜像id
docker search 搜索镜像
1 2 3 4 5 6 7 8 9 10 11 12 13 14
[root@localhost etc]# docker search mysql NAME DESCRIPTION STARS OFFICIAL AUTOMATED mysql MySQL is a widely used, open-source relation… 9934 [OK] mariadb MariaDB is a community-developed fork of MyS… 3634 [OK] mysql/mysql-server Optimized MySQL Server Docker images. Create… 724 [OK] percona Percona Server is a fork of the MySQL relati… 508 [OK]
# 可选项 [root@localhost etc]# docker search -h -f, --filter filter Filter output based on conditions provided --format string Pretty-print search using a Go template --limit int Max number of search results (default 25) --no-trunc Don't truncate output
[root@localhost etc]# docker images -a REPOSITORY TAG IMAGE ID CREATED SIZE mysql 5.7 d589ea3123e0 2 days ago 448MB mysql latest 3646af3dc14a 2 days ago 544MB hello-world latest bf756fb1ae65 8 months ago 13.3kB [root@localhost etc]# docker rmi -f 3646af3dc14a 通过id删除 [root@localhost etc]# docker rmi -f id id id 删除多个镜像 [root@localhost etc]# docker rmi -f $(docker images -aq) 删除全部镜像
# 测试 ## 启动并进入容器 [root@localhost etc]# docker run -it centos /bin/bash [root@dc22cdc304ab /]# ls # 查看容器内的centos bin etc lib lost+found mnt proc run srv tmp var dev home lib64 media opt root sbin sys usr
[root@localhost /]# docker ps CONTAINER ID IMAGE COMMAND CREATED STATUS PORTS NAMES [root@localhost /]# docker ps CONTAINER ID IMAGE COMMAND CREATED STATUS PORTS [root@localhost /]# docker ps -a CONTAINER ID IMAGE COMMAND CREATED STATUS PORTS NAMES 115f580f95bd centos "/bin/bash" 2 minutes ago Exited (0) 2 minut es ago amazing_vaughan dc22cdc304ab centos "/bin/bash" 6 minutes ago Exited (0) 3 minut es ago unruffled_satoshi 6831b24d8b06 bf756fb1ae65 "/hello" About an hour ago Exited (0) About a n hour ago zealous_blackburn [root@localhost /]# docker ps -a -n=1 CONTAINER ID IMAGE COMMAND CREATED STATUS PORTS NAMES 115f580f95bd centos "/bin/bash" 3 minutes ago Exited (0) 3 minutes ago amazing_vaughan [root@localhost /]# docker ps -aq 115f580f95bd dc22cdc304ab 6831b24d8b06
退出容器
1 2 3 4 5 6 7 8
exit# 停止容器并退出 Ctrl+P+Q # 容器不停止退出
[root@9c647327935f /]# docker ps[root@localhost /]# docker ps CONTAINER ID IMAGE COMMAND CREATED STATUS PORTS NAMES 9c647327935f centos "/bin/bash" 45 seconds ago Up 45 seconds nervous_elgamal [root@localhost /]#
[root@localhost /]# docker ps -a CONTAINER ID IMAGE COMMAND CREATED STATUS PORTS NAMES 427a0b73db5e centos "/bin/bash" 48 seconds ago Exited (127) 35 seconds ago romantic_booth [root@localhost /]# docker start 427a0b73db5e 427a0b73db5e [root@localhost /]# docker ps -a CONTAINER ID IMAGE COMMAND CREATED STATUS PORTS NAMES 427a0b73db5e centos "/bin/bash" About a minute ago Up 7 seconds romantic_booth [root@localhost /]# docker stop 427a0b73db5e 427a0b73db5e
常用其他命令
后台启动容器
1 2 3 4 5 6 7 8
[root@localhost ~]# docker run -d centos e42dc17c4ded0270fbdce2d0697804787986319854edbda5f2fe2bf49a184d35 [root@localhost ~]# docker ps -a CONTAINER ID IMAGE COMMAND CREATED STATUS PORTS NAMES e42dc17c4ded centos "/bin/bash" 43 seconds ago Exited (0) 24 seconds ago agitated_hoover 427a0b73db5e centos "/bin/bash" 15 hours ago Exited (0) 15 hours ago romantic_booth
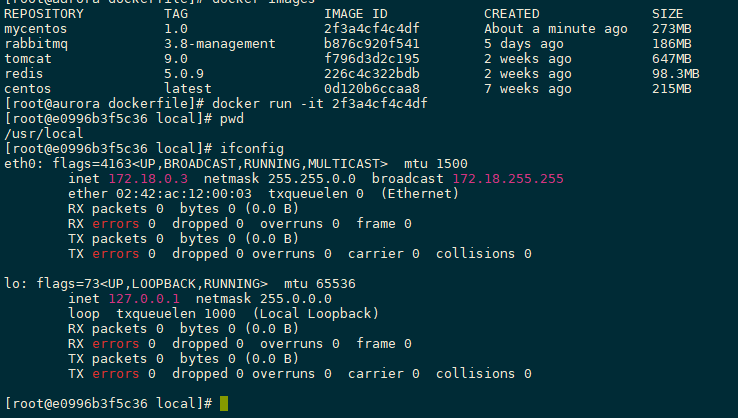
# 3 测试 [root@localhost ~]# docker images REPOSITORY TAG IMAGE ID CREATED SIZE nginx latest 4bb46517cac3 3 weeks ago 133MB centos latest 0d120b6ccaa8 4 weeks ago 215MB # -d 后台启动 --name 给容器命名 -p宿主机端口:容器内部端口 [root@localhost ~]# docker run -d --name nginx098 -p 3344:80 nginx bb9437232f7143a92dc3797b2535489d731b4e4882e53265001c39634089aa23 [root@localhost ~]# docker ps CONTAINER ID IMAGE COMMAND CREATED STATUS PORTS NAMES bb9437232f71 nginx "/docker-entrypoint.…" 23 seconds ago Up 11 seconds 0.0.0.0:3344->80/tcp nginx098
[root@localhost ~]# curl localhost:3344 <!DOCTYPE html> <html> <head> <title>Welcome to nginx!</title> <style> body { width: 35em; margin: 0 auto; font-family: Tahoma, Verdana, Arial, sans-serif; } </style> </head> <body> <h1>Welcome to nginx!</h1> <p>If you see this page, the nginx web server is successfully installed and working. Further configuration is required.</p>
<p>For online documentation and support please refer to <a href="http://nginx.org/">nginx.org</a>.<br/> Commercial support is available at <a href="http://nginx.com/">nginx.com</a>.</p>
<p><em>Thank you for using nginx.</em></p> </body> </html>
安装Tomcat
1
2
3
4
5
6
7
8
9
# 官方 docker run -it --rm tomcat:9.0 # 我们之前的启动都是后台,停止容器后还可以查到,docker run -it --rm 一般用来测试 用完即删的(删除容器不会删除镜像)
# 正常启动 docker run -d -p 8090:8080 --name tomcat1 tomcat
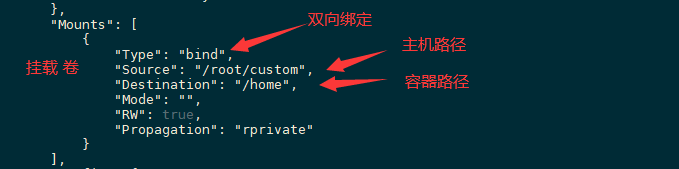
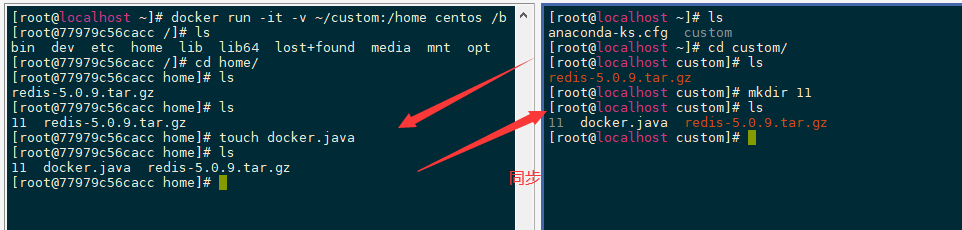
[root@localhost ~]# docker run -it -v ~/custom:/home centos /bin/bash [root@77979c56cacc /]# ls bin dev etc home lib lib64 lost+found media mnt opt proc root run sbin srv sys tmp usr var [root@77979c56cacc /]# cd home/ [root@77979c56cacc home]# ls redis-5.0.9.tar.gz
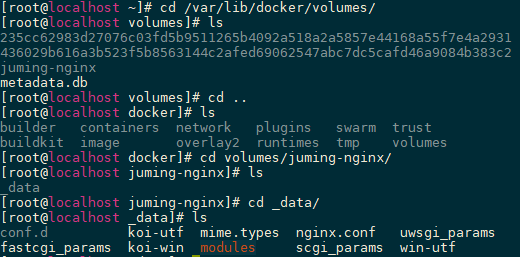
# 查看所有volume的情况 [root@localhost ~]# docker volume ls DRIVER VOLUME NAME local 235cc62983d27076c03fd5b9511265b4092a518a2a5857e44168a55f7e4a2931 local 436029b616a3b523f5b8563144c2afed69062547abc7dc5cafd46a9084b383c2 # 这种就是匿名挂载
#具名挂载 [root@localhost ~]# docker run -d -P --name nginx02 -v juming-nginx:/etc/nginx nginx 293c0e013dba80a42ff854b0ea5019a28233197f16ab12a1cd2230c517d321a1 [root@localhost ~]# docker volume ls DRIVER VOLUME NAME local 235cc62983d27076c03fd5b9511265b4092a518a2a5857e44168a55f7e4a2931 local 436029b616a3b523f5b8563144c2afed69062547abc7dc5cafd46a9084b383c2 local juming-nginx # 通过 -v 卷名:容器内路径 查看一下这个卷
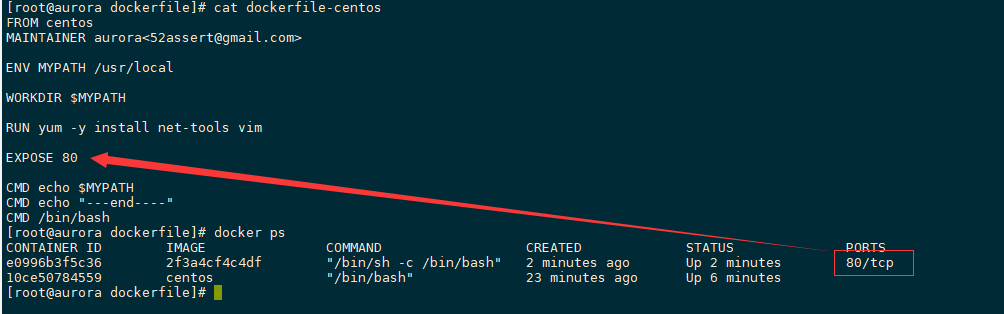
# 编写dockerfile文件 [root@localhost ~]# vim dockerfile-test-cmd FROM centos
CMD ["ls","-a"]
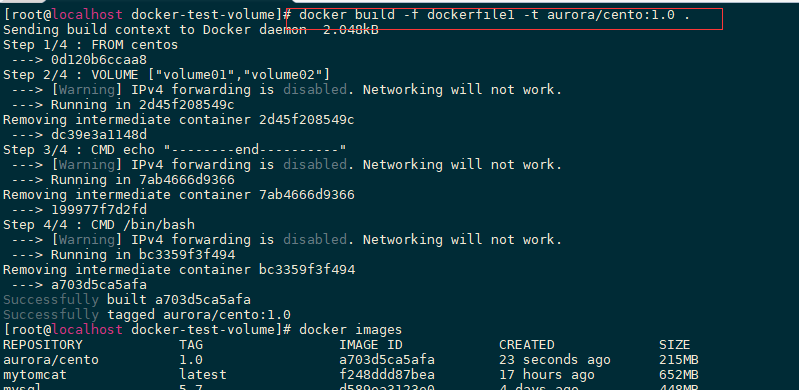
# 构建镜像 [root@localhost ~]# docker build -f dockerfile-test-cmd -t cmdtest . Sending build context to Docker daemon 2.031MB Step 1/2 : FROM centos ---> 0d120b6ccaa8 Step 2/2 : CMD ["ls","-a"] ---> [Warning] IPv4 forwarding is disabled. Networking will not work. ---> Running in 8614ac972b4e Removing intermediate container 8614ac972b4e ---> a30c685ac1a8 Successfully built a30c685ac1a8 Successfully tagged cmdtest:latest
# 运行 ls -a 生效 [root@localhost ~]# docker run a30c685ac1a8 WARNING: IPv4 forwarding is disabled. Networking will not work. . .. .dockerenv bin dev etc home lib lib64 lost+found media mnt opt proc root run sbin srv sys tmp usr var
# 想追加一个命令 -l ls -al [root@localhost ~]# docker run a30c685ac1a8 -l WARNING: IPv4 forwarding is disabled. Networking will not work. docker: Error response from daemon: OCI runtime create failed: container_linux.go:349: starting container process caused "exec: \"-l\": executable file not found in $PATH": unknown.
[root@aurora ~]# docker run -d -p 8080:8080 f796d3d2c195 de57956557a2d041ed84f5344bd27ef36a0277bf02d16218873c6af4e3e056a9
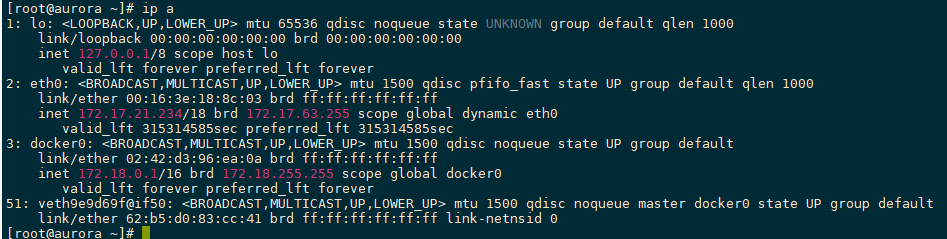
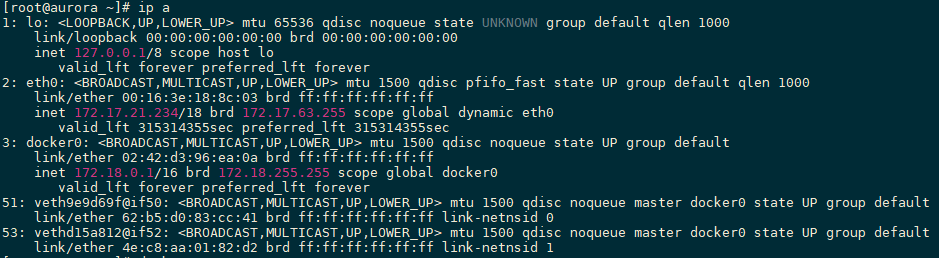
# 查看容器网络 [root@aurora ~]# docker exec -it de57956557a2 ip a 1: lo: <LOOPBACK,UP,LOWER_UP> mtu 65536 qdisc noqueue state UNKNOWN group default qlen 1000 link/loopback 00:00:00:00:00:00 brd 00:00:00:00:00:00 inet 127.0.0.1/8 scope host lo valid_lft forever preferred_lft forever 50: eth0@if51: <BROADCAST,MULTICAST,UP,LOWER_UP> mtu 1500 qdisc noqueue state UP group default link/ether 02:42:ac:12:00:02 brd ff:ff:ff:ff:ff:ff link-netnsid 0 inet 172.18.0.2/16 brd 172.18.255.255 scope global eth0 valid_lft forever preferred_lft forever
# Linux能ping通docker容器内部 [root@aurora ~]# ping 172.18.0.2 PING 172.18.0.2 (172.18.0.2) 56(84) bytes of data. 64 bytes from 172.18.0.2: icmp_seq=1 ttl=64 time=0.096 ms 64 bytes from 172.18.0.2: icmp_seq=2 ttl=64 time=0.089 ms 64 bytes from 172.18.0.2: icmp_seq=3 ttl=64 time=0.083 ms 64 bytes from 172.18.0.2: icmp_seq=4 ttl=64 time=0.080 ms